How this works (read this once)
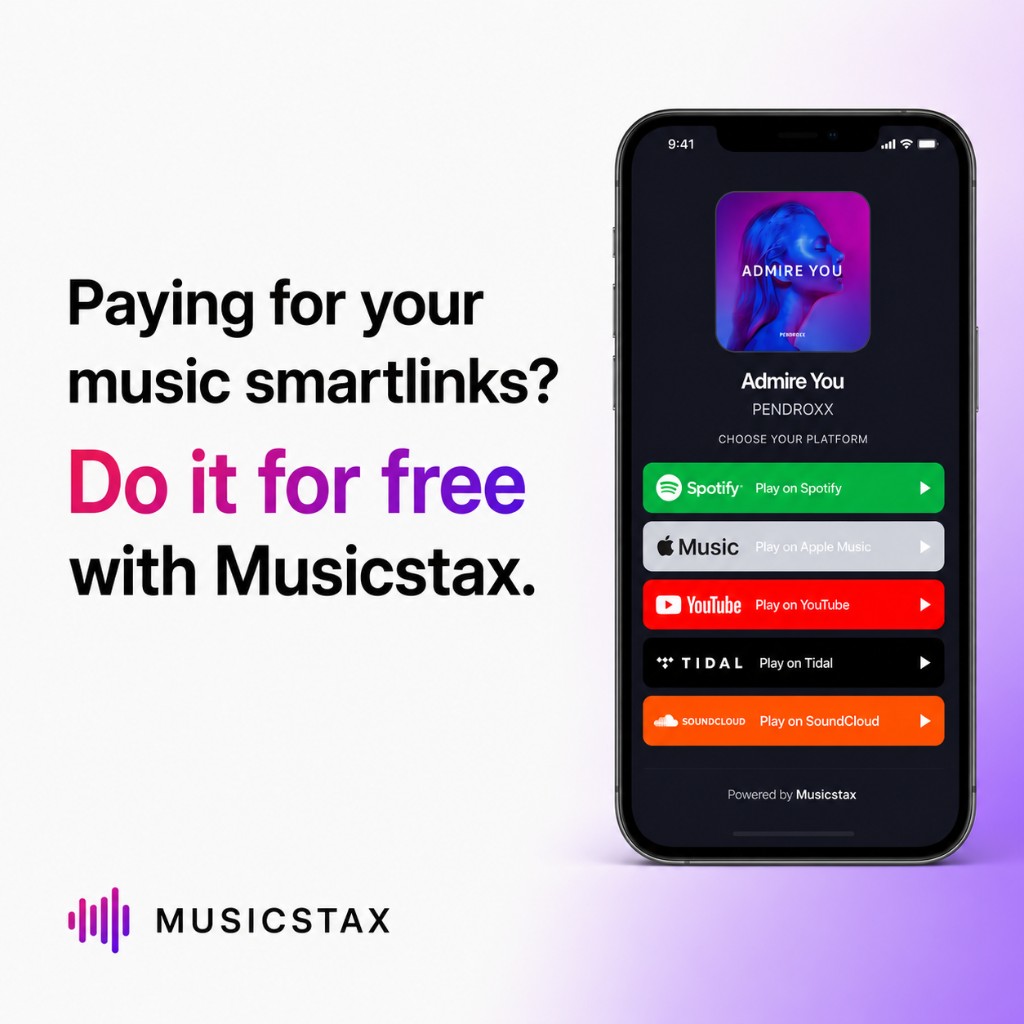
Meta cannot send someone straight into the Spotify app and reliably count that as a conversion you can optimize for. The workaround used by serious music marketers:
Your ad sends people to a Musicstax Smart Link — one page with Spotify, Apple Music, Tidal, etc.
When someone taps Spotify (or any platform), Musicstax fires MusicstaxTrackLinkClick to your Meta Pixel — with a parameter music_service telling Meta which button was pressed.
You create a custom conversion that only counts Spotify taps. Ads Manager then finds more people like those converters.
Before you begin
What you need
Gather these before opening Ads Manager. Missing any one will block you later.
- Your release live on Spotify — the Smart Link needs a real Spotify URL fans can open.
- A personal Facebook account — you log into Business Manager with this.
- A Facebook Page for your artist / project.
- A payment method on your Meta ad account.
- A test budget — most artists start at $5–$20/day. You can change this anytime.
Part 1
Create your Musicstax Smart Link
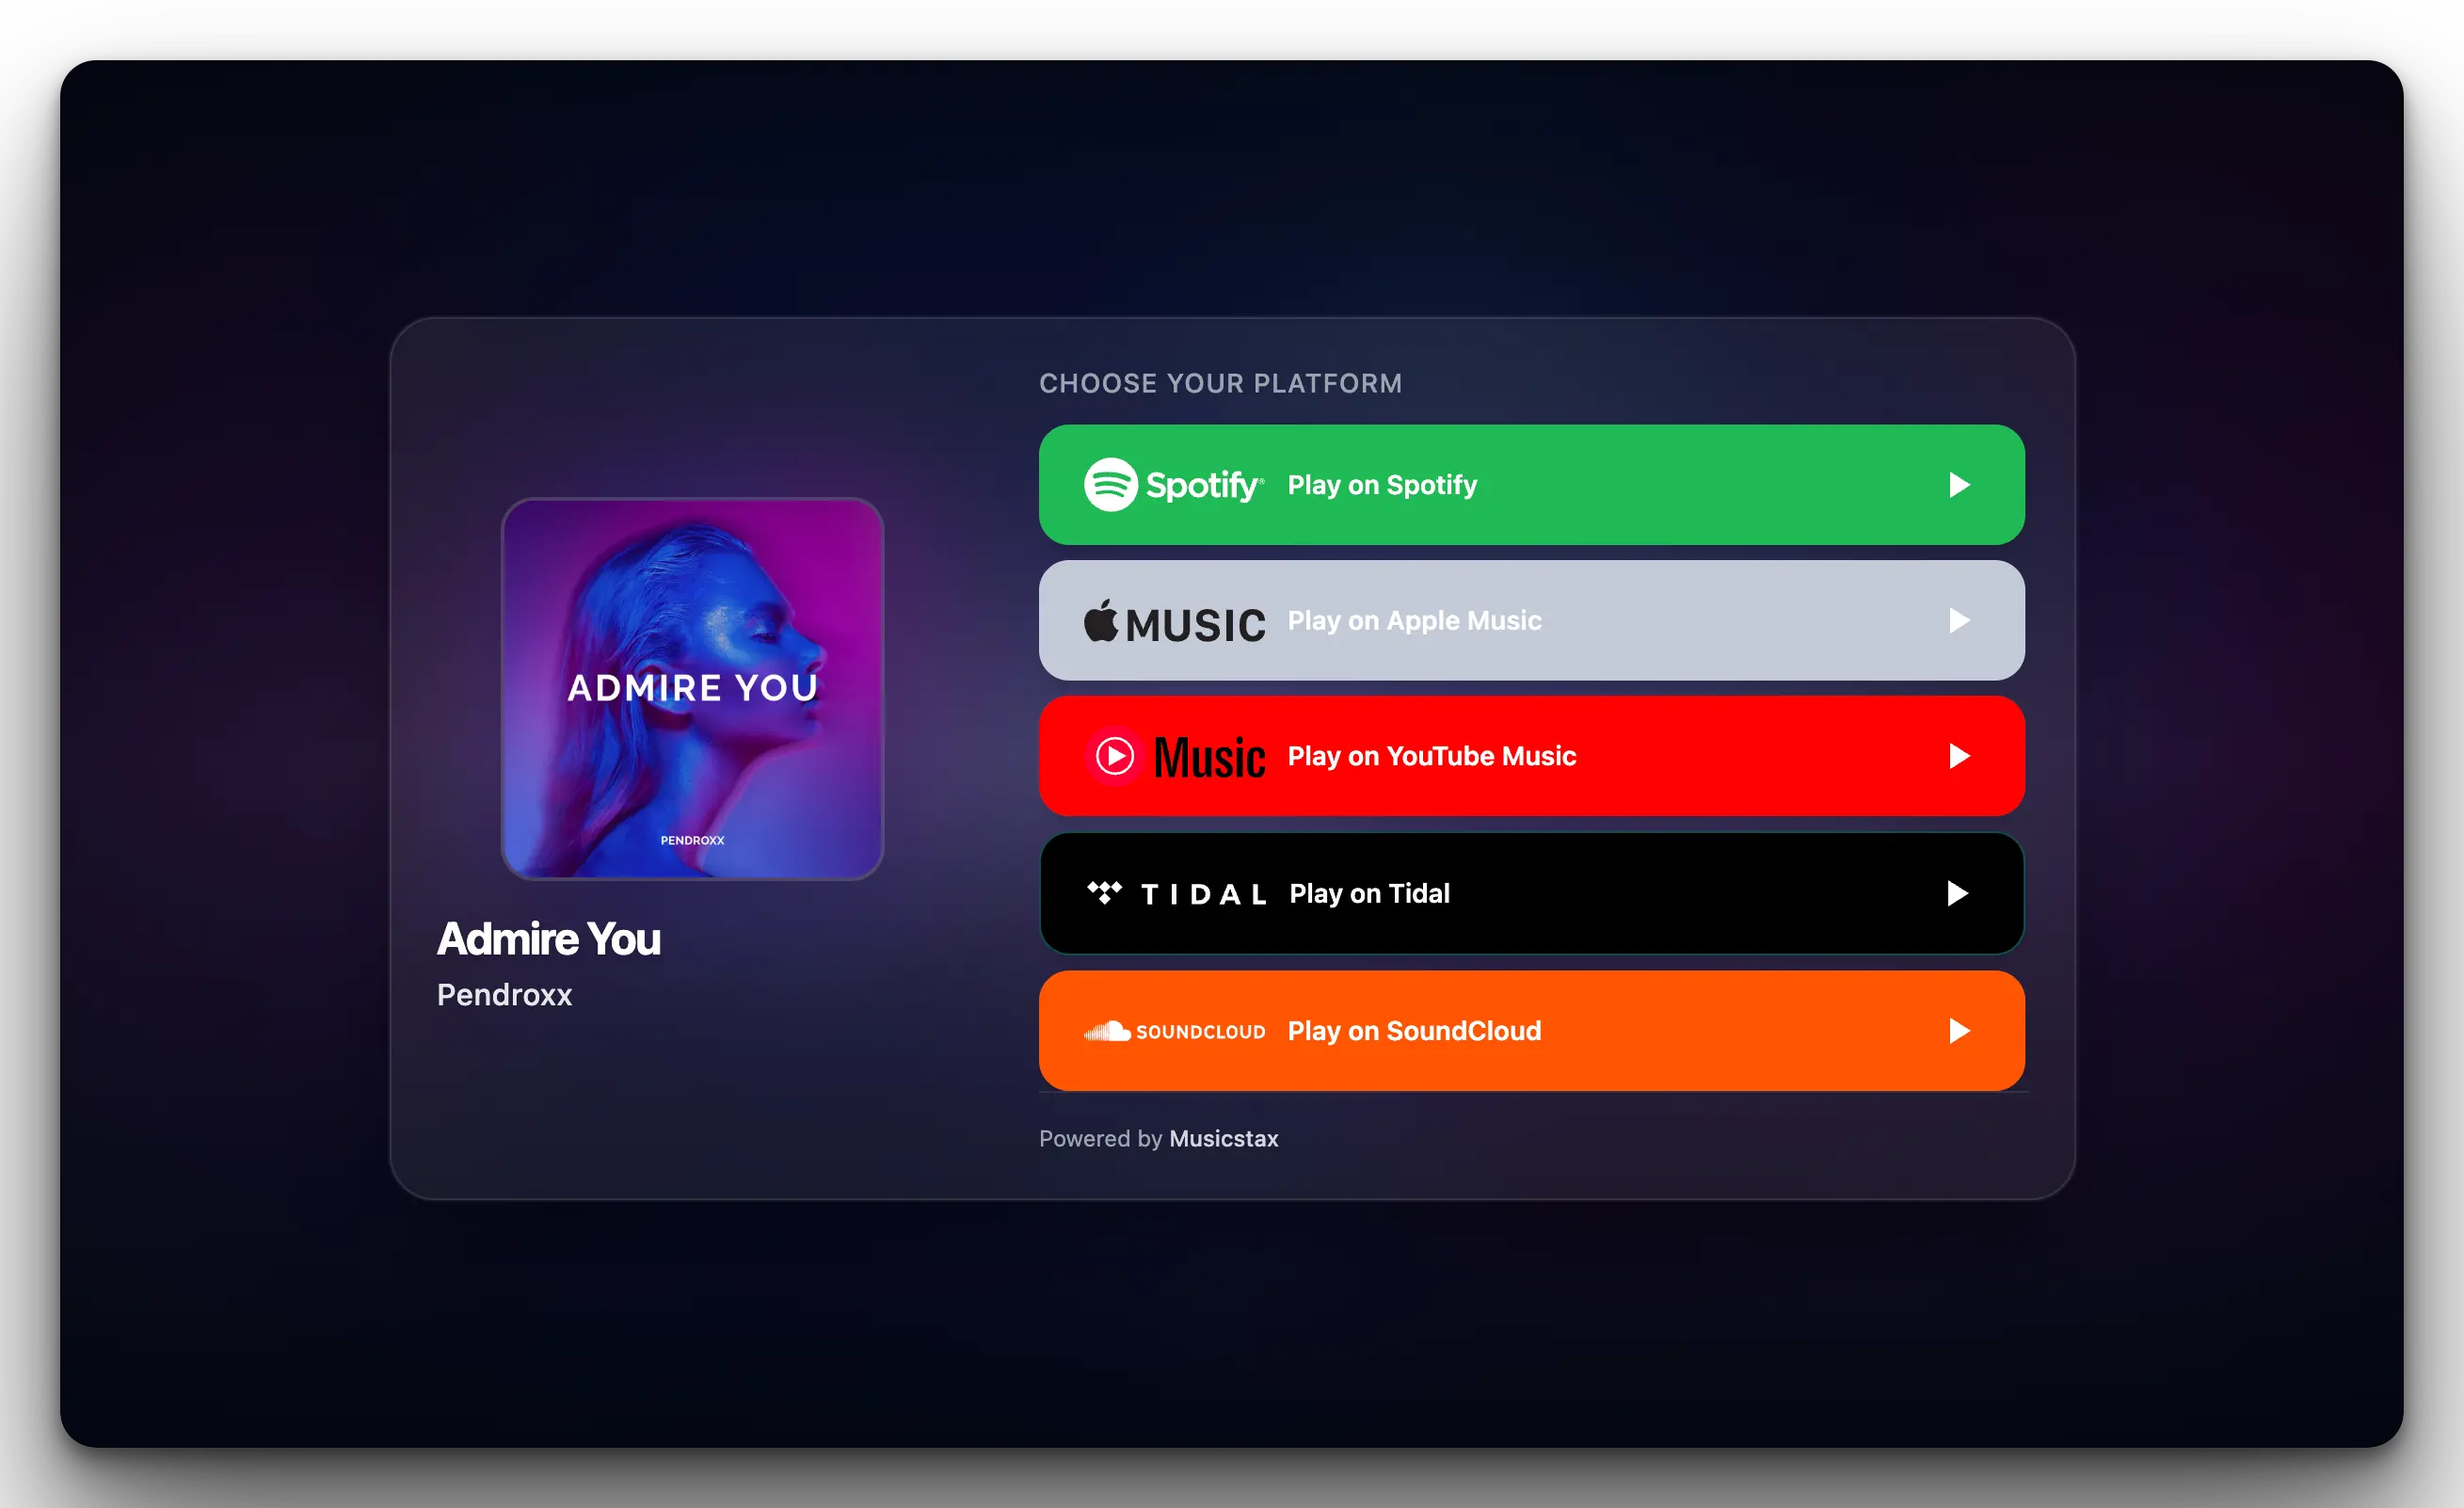
Your Smart Link is the page the ad sends people to. Artwork, title, and streaming buttons — plus your Meta Pixel so every platform tap is tracked.
Step 1 — Open Smart Links
- Log into Musicstax → Dashboard → Smart Links.
- Click Create link.
Step 2 — Add your Meta Pixel in Musicstax
You create the pixel itself in Meta in Part 3. If you already have a Pixel ID, add it now. If not, skip to Part 3, then return here.
- On Smart Links, click Manage pixels.
- Enter a friendly name (e.g. "My Artist Pixel") and your numeric Pixel ID from Meta Events Manager.
- Optional but recommended: paste a Conversions API access token (Events Manager → Pixel → Settings → Conversions API → Generate access token). This improves tracking when browser cookies are blocked.
- Click Add pixel. Use Test connection to send a sample event immediately if you want.
Step 3 — Create and publish the link
- Click Create link → search for your track or paste the Spotify track URL.
- Review artwork, title, and platform buttons.
- Pick a short slug — your URL becomes https://mkt.sx/my-new-single
- Under Meta Pixel, select the pixel you saved. Required for conversion tracking.
- Publish and copy the full URL. That URL is what goes in your ad — not Spotify.
Part 2
Set up Meta Business Manager
Meta Business Suite (business.facebook.com) holds your Page, ad account, and pixel. First-time advertisers usually need a business portfolio.
Step 4 — Create or open a Business portfolio
- Go to business.facebook.com and log in with your personal Facebook account.
- If prompted, Create account — use your artist/project name, your name, and a business email.
- If you already have a portfolio, select it from the top-left switcher.
Step 5 — Confirm your Facebook Page
- Business Settings (gear) → Accounts → Pages.
- If your artist Page is listed, you are done. Otherwise Add → Create a new Page or Add an existing Page.
- Category: Musician/Band. Add a profile photo that matches your artist brand.
Step 6 — Create an Ad account
- Business Settings → Accounts → Ad accounts → Add → Create a new ad account.
- Name it clearly (e.g. "Artist Name Ads"). Set timezone and currency carefully — hard to change later.
- Add a payment method when prompted. Ads will not deliver without a valid card.
Part 3
Create your Meta Pixel and verify events
The Meta Pixel is tracking code. Musicstax installs it on your Smart Link when you attach a pixel — you do not paste code into a website yourself.
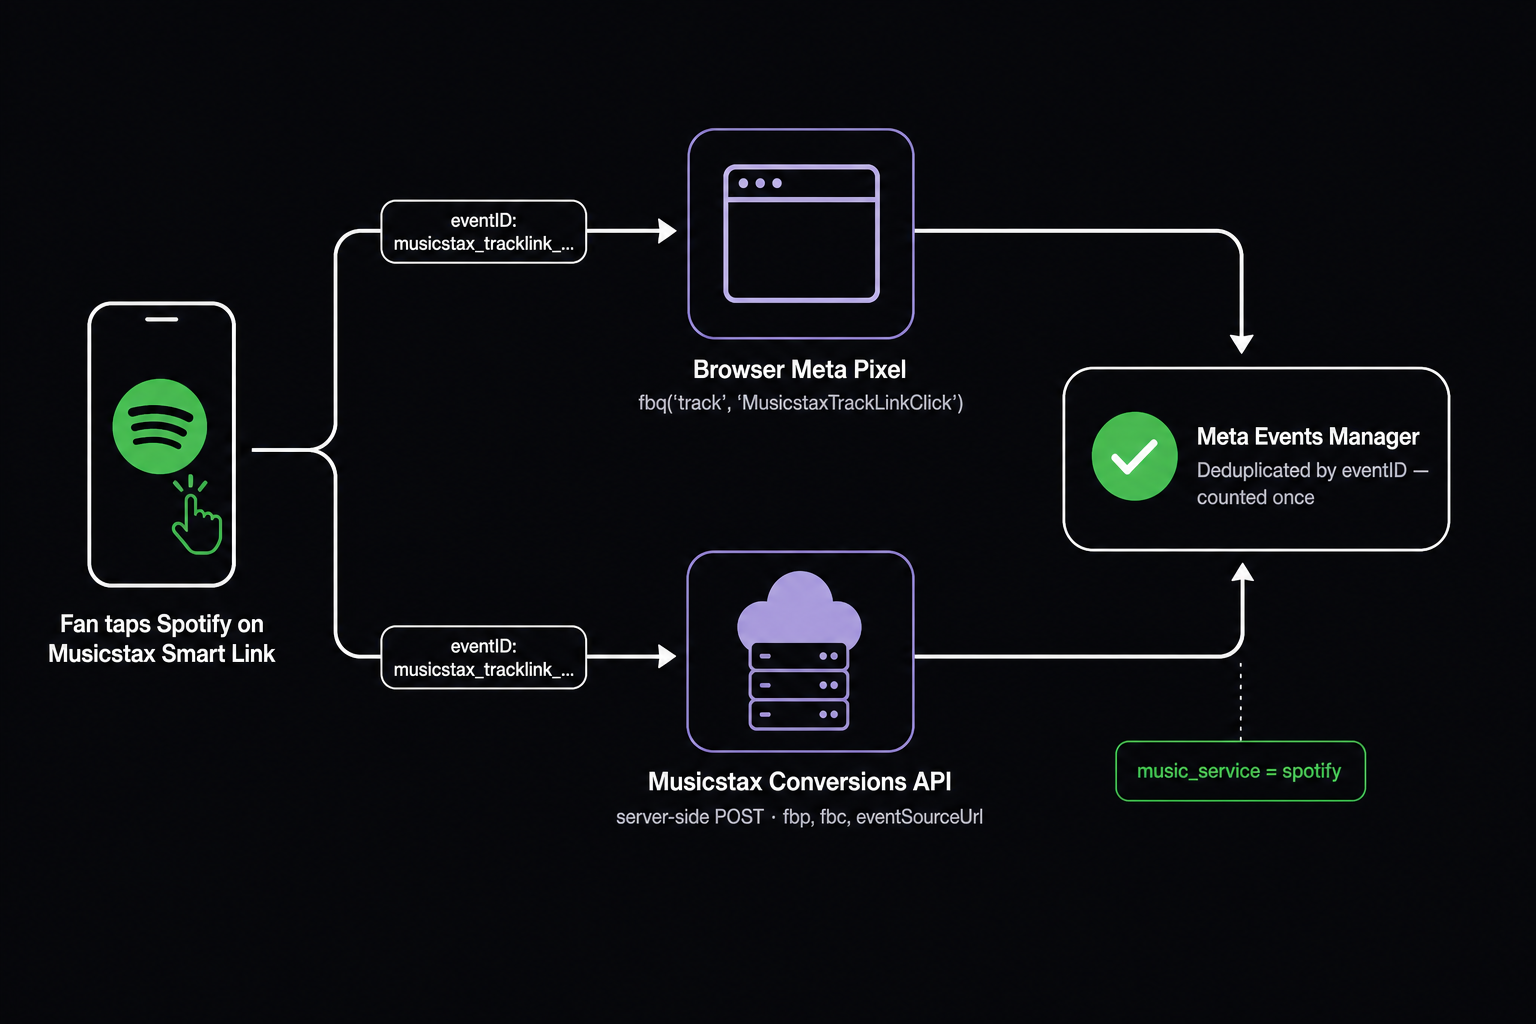
Under the hood, Musicstax sends each Spotify tap twice — once from the browser Pixel and once server-side via the Conversions API — sharing one eventID so Meta deduplicates and counts it a single time. The server signal is why tracking still works when ad blockers or iOS strip browser cookies, and it is why adding a Conversions API token in Part 1 is worth it.
Step 7 — Create the Pixel in Events Manager
- Business Settings → Business assets → Events Manager (or business.facebook.com/events_manager).
- Connect data sources → Web → Meta Pixel → Connect.
- Name the pixel (match Musicstax), enter your Smart Link URL as the website if asked.
- Create, then copy the Pixel ID (long number on the overview).
- Musicstax → Smart Links → Manage pixels → save that ID if you have not already.
Step 8 — Fire a real Spotify click (Test events)
- Events Manager → select your Pixel → Test events tab.
- Open your live Smart Link in a normal browser (ad blockers off).
- Click the Spotify button — you do not need to listen; the click is the conversion.
- Within a few seconds, Test events should show MusicstaxTrackLinkClick.
- Expand it and confirm: music_service is spotify, plus your track in content_name or title.
What Musicstax sends on every platform tap
Event name is always the same. The music_service parameter tells you which button was pressed.
- Event name
MusicstaxTrackLinkClickCustom event — same for Spotify, Apple Music, Tidal, etc.
- music_service
spotifyAlso: apple_music, youtube_music, tidal, soundcloud, …
- content_name
Artist - Track- content_category
Music- Also sent
PageView, ViewContentFired when someone lands on the Smart Link — useful for awareness, not for Spotify optimization.
Step 9 — Approve the custom event if Meta asks
New event names sometimes appear under Overview → Event activities needing attention. If Meta flags MusicstaxTrackLinkClick, open it and confirm you recognize it. Normal for first-time custom events.
Part 4
Create the Spotify custom conversion
This is the most important setup step in the entire guide. A custom conversion tells Meta: “count this specific action as a conversion.” You want Spotify button taps — not Apple Music, not page views.
Exact recipe — copy this
Smart Link — Spotify click
- Data source
Your Meta Pixel- Conversion event
MusicstaxTrackLinkClick- Rule
music_service equals spotifyExact match. Value must be spotify (lowercase), not “Spotify” or “Play on Spotify”.
- Name
Smart Link — Spotify click- Category
OtherOr whatever Meta offers that fits — category is mostly for reporting labels.
Step 10 — Wait for event data
Meta needs at least one real MusicstaxTrackLinkClick before the name appears in dropdowns. After your test click in Step 8, wait 15–30 minutes (sometimes up to an hour) before creating the conversion.
Step 11 — Create it in Events Manager
- Events Manager → select your Pixel.
- Custom conversions tab (or All tools → Custom conversions).
- Create custom conversion.
- Data source: your Pixel.
- Conversion event: MusicstaxTrackLinkClick. Missing? Wait longer and send another Spotify test click.
- Add rule: Parameter music_service → equals → spotify.
- Name it "Smart Link — Spotify click". Create / Save.
Part 5
Create your ad campaign
Ads Manager has three levels: Campaign (objective) → Ad set (audience, budget, conversion) → Ad (creative).
Step 12 — Open Ads Manager
- Go to adsmanager.facebook.com (or Business Suite → Ads → Create ad).
- Confirm the correct ad account in the top-left dropdown.
- Click the green + Create button.
Step 13 — Choose Sales (website conversions)
- Objective: Sales (sometimes called Conversions). This is what lets you optimize toward your custom conversion.
- Where conversions happen: Website.
- Campaign name: e.g. "New Single — Spotify conversions — Jul 2026".
- For your first test, turn off Advantage+ campaign budget if you want simple daily control at the ad set.
- Click Next.
Part 6
Configure your ad set
Who sees the ad, how much you spend, and what Meta optimizes for.
Step 14 — Conversion settings (critical)
- Conversion location: Website.
- Performance goal: Maximize number of conversions.
- Dataset / Pixel: select your Pixel.
- Conversion event: choose your custom conversion "Smart Link — Spotify click" from Part 4.
- If it is missing: wait, refresh, send another test Spotify click, confirm you picked the same Pixel.
Step 15 — Audience basics
Set age, gender, and locations here. For locations, jump to the Country tiers section below — that choice usually matters more than interests.
- Age: start 18–44 (or match your Spotify for Artists peak).
- Gender: All, unless analytics show a strong skew and you are stuck.
- Detailed targeting (interests): leave empty on your first campaign — let the pixel find converters inside your countries.
- If you add interests later: Spotify + one genre max. Too many interests shrinks delivery.
Advantage+ audience
When ON, Meta can expand beyond your exact interest settings (still usually inside your countries) if it predicts better conversion rates. Fine for a first Tier 1 campaign. Always set countries explicitly first — Advantage+ does not replace location strategy.
Step 16 — Placements
- Advantage+ placements (automatic) is fine for most music ads.
- Manual option: prioritize Instagram Reels, Stories, and Feed.
- Skip Audience Network on your first campaign — quality for music is mixed.
Step 17 — Budget and schedule
- Daily budget: $10/day is a solid first test. $5/day works but learning is slower.
- Schedule: start today; end date optional — pause manually when you want.
- Bid strategy: Highest volume / Lowest cost (default) unless you know cost caps.
- Click Next to build the ad.
Rough cost expectations (Spotify click)
Ballpark only — genre, creative, and seasonality move these a lot.
- Tier 1Often $0.30–$1.50+ per Spotify conversion
- Tier 2Often cheaper; good scale after a Tier 1 win
- Tier 3Cheapest clicks — weakest playlist / LTV signal
Targeting deep-dive
Country tiers for music ads
Meta does not label countries as Tier 1 / 2 / 3 — music marketers do. You pick countries manually in the ad set Locations field. This is usually the biggest lever on cost and whether streams actually help your career.
Tier 1
Premium markets
- United States
- United Kingdom
- Canada
- Australia
- Germany, France, Netherlands
- Sweden, Norway, Denmark
- Ireland, New Zealand
Tier 2
Strong Spotify, lower cost
- Italy, Spain, Portugal
- Poland, Czech Republic
- Belgium, Austria, Switzerland
- Brazil, Mexico, Argentina
- Japan, South Korea
- Finland, Romania, Greece
Tier 3
High volume, lower value
- India, Indonesia, Philippines
- Turkey, Egypt, Nigeria
- Colombia, Chile, Peru
- Thailand, Vietnam, Malaysia
- Many other emerging markets
Industry groupings — not an official Meta or Spotify list. Genre matters: Latin America can be Tier 1 for reggaeton / Latin pop even if it is Tier 2 “overall.”
Tier 1 — when to use it
- First campaign if budget allows — higher cost per Spotify click, strongest playlist and press signal.
- When you need credible US/UK growth for pitching, press, or label conversations.
- When English-language music already performs there in Spotify for Artists.
Tier 2 — when to use it
- Scaling after Tier 1 works — same creative, cheaper clicks, more volume.
- When your genre has a natural home market (Brazil, Spain, Poland, etc.).
- Best cost/quality balance for many indie budgets.
Tier 3 — when to use it
- Very tight budgets / creative testing only — cheap proof that hooks work.
- When Spotify for Artists already shows listeners concentrated there.
- Avoid as your only strategy if you care about Western playlist algorithms.
How to set locations (click by click)
- Ad set → Audience → Locations (sometimes under Audience controls).
- Include (not Exclude). Location type: People living in this location.
- Type each country and select it. Starter Tier 1: United States, United Kingdom, Canada, Australia.
- Check the audience size estimate — under ~100k can starve delivery; “Worldwide” usually wastes budget.
- Do not select Worldwide on your first conversion campaign.
Part 7
Build your ad creative
Creative quality often matters more than micro-targeting. Treat the first 2 seconds as non-negotiable.
Step 18 — Identity
- Facebook Page: your artist Page.
- Instagram account: connected profile (strongly recommended for Reels).
Step 19 — Media
- Format: single image or video. Vertical 9:16 wins on Reels and Stories.
- Best performers: song snippet with waveform/artwork, performance clip, lyric visual, or “new song out” hook.
- Under 30 seconds for cold audiences. Hook in the first 2 seconds — face, title, or the catchiest bar.
- Captions on: many people watch muted.
Step 20 — Copy and destination URL
- Primary text: short hook + CTA, e.g. "New single out now. Tap to listen on Spotify."
- Headline: track name or "Listen now".
- CTA button: Listen Now or Learn More.
- Website URL: your full Smart Link — e.g. https://mkt.sx/your-slug — NEVER open.spotify.com.
- Display link: optional clean version of the Smart Link domain.
Step 21 — Tracking
- Confirm your Pixel is listed under Tracking / Destination.
- URL parameters are optional — Musicstax already sends event parameters.
Part 8
Review, publish, and learning phase
Step 22 — Publish
- Click Publish. Meta policy review usually takes minutes (sometimes up to 24 hours).
- If rejected: read the reason in Ads Manager. Common fixes — less text on images, no misleading claims, use audio/video you have rights to.
- Approved → Active → delivery starts.
Step 23 — Learning phase
Meta needs roughly ~50 optimization events per week for stable delivery. At $10/day that can take several days. Avoid editing the ad set every few hours for the first 3–7 days unless something is clearly broken (wrong URL, zero events in Events Manager, rejected creative).
Part 9
Monitor results
In Ads Manager
- Campaigns → select your campaign.
- Customize columns: Results (your custom conversion), Cost per result, Link clicks, Amount spent.
- Judge success on cost per Spotify conversion after the learning phase — not day-one CPC.
In Events Manager
- Pixel Overview → MusicstaxTrackLinkClick volume.
- Breakdown → By parameter → music_service to compare Spotify vs Apple Music vs others.
In Musicstax Smart Links
- Dashboard → Smart Links → open your link analytics.
- Compare visits vs platform clicks — Musicstax shows clicks even when Meta attribution windows disagree.
One-page cheat sheet
Ad → Smart Link URL → fan taps Spotify
Event: MusicstaxTrackLinkClick
Filter: music_service = spotify
Custom conversion name: Smart Link — Spotify click
Campaign objective: Sales → Website
Optimize for: that custom conversion (not Link Click)
Locations (first test): US + UK + Canada + Australia
Budget: $10/day · Age 18–44 · Interests: empty
Creative: 9:16 video, hook in 2s, CTA “Listen on Spotify”
Pre-launch checklist
- □ Pixel saved in Musicstax and attached to the Smart Link
- □ Test events shows MusicstaxTrackLinkClick with music_service = spotify
- □ Custom conversion created and selectable in the ad set
- □ Ad website URL is the Smart Link (not Spotify)
- □ Countries chosen on purpose (not Worldwide)
- □ Payment method on the ad account
Troubleshooting
No events in Test events
Pixel attached to the link? Ad blockers off? Clicked Spotify on the live link (not a Musicstax preview)? Try Manage pixels → Test connection, then tap Spotify again.
MusicstaxTrackLinkClick missing from custom conversion dropdown
Send another Spotify test click and wait 30–60 minutes. The event must appear in Events Manager Overview before it is selectable.
Custom conversion missing in the ad set
Can take up to an hour to sync. Refresh. Confirm the ad set uses the same Pixel the conversion was built on. Objective must support website conversions (Sales).
Ad spends but zero conversions
Destination URL must be the Smart Link. Confirm Events Manager still records Spotify taps. Low spend may just mean learning has not finished.
Lots of Apple Music clicks, few Spotify
Common on iOS. Your custom conversion already filters optimization to Spotify. Creative that says “Listen on Spotify” helps nudge the button choice.
Cost per result looks insane on day 1
Normal during learning. Reassess after ~50 conversions or a full week at your daily budget — whichever comes first. Change creative before countries if the hook is weak.
Need help with Smart Links or pixel setup? Contact support or return to Smart Links.